Setup your rasp.io inspiring NTP clock on Pi Zero W
Get it working quick following these steps
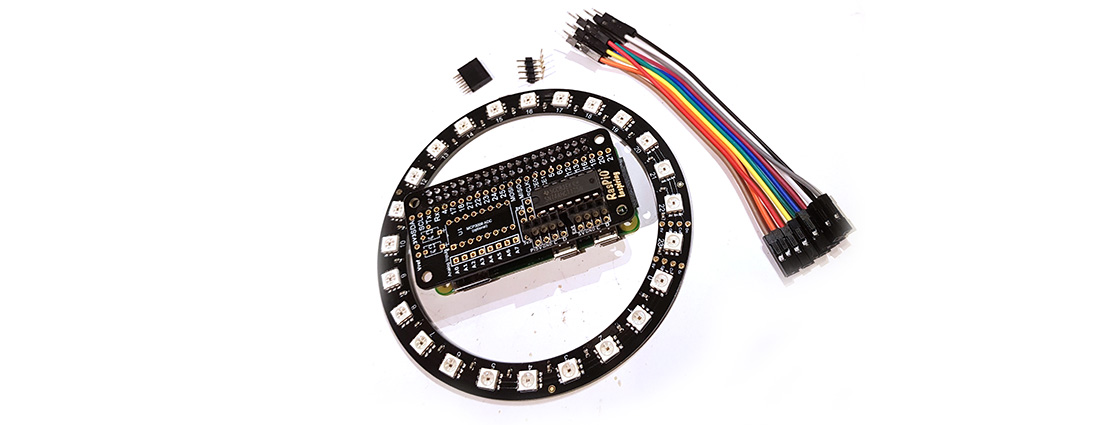
I've backed a few rasp.io Kickstarter projects. I seem to find them irresistible. The new rasp.io inspiring was just the same as one of the rewards was a ring of coloured LEDs along with an interface board and one of the new Pi Zero W (which had recently been released when the Kickstarter campaign was running ) InstaBack! Here is an itemised set of brief instructions on how to get this kit online and showing the time.
Three things to note before I start:
- To follow these instructions I used a raspberry Pi 3 with built in wifi to get the sd card set up quickly. If you have an existing pi zero which you can easily attach a keyboard, monitor and mouse to you can follow these instructions as well.
- Secondly, the rasp.io documentation is really good. There are videos for those that prefer learning that way, and very detailed and simple manuals.
This below is just to document the quickest way you can get your NTP clock project up and running up. - If you were not part of the Kickstarter project you can nowbuy these boards/kits here: rasp.io/inspiring/.
In addition to the supplied kit I needed an SD card, and some header strips. I used a Kingston 8gb class 4 card and a long row of single PCB headers which I cut down to make two rows.
So here is the process:
- Solder the IC socket and the two dupont sockets to the TOP of the inspiring board.
- Solder the Pi Header socket to the BOTTOM of the inspiring board.
- Put the PCB headers into the inspiring header socket, attach the Pi Zero to the header, and solder these on. Remove the Raspberry Pi from the inspiring board.
- Insert the right angled header pins supplied with the circular LED board into the D IN set of holes in the LED board and solder these 4 pins in. This completes the soldering of the project. You can watch me doing this on Youtube below:
- At this point I attached the inspiring board to my already set up Raspberry Pi 3. If you have a keyboard/monitor/mouse setup that will work on your Pi Zero W you can just connect the board back up the that. I removed the existing SD card from my Pi 3 – as I didn't want to use that.
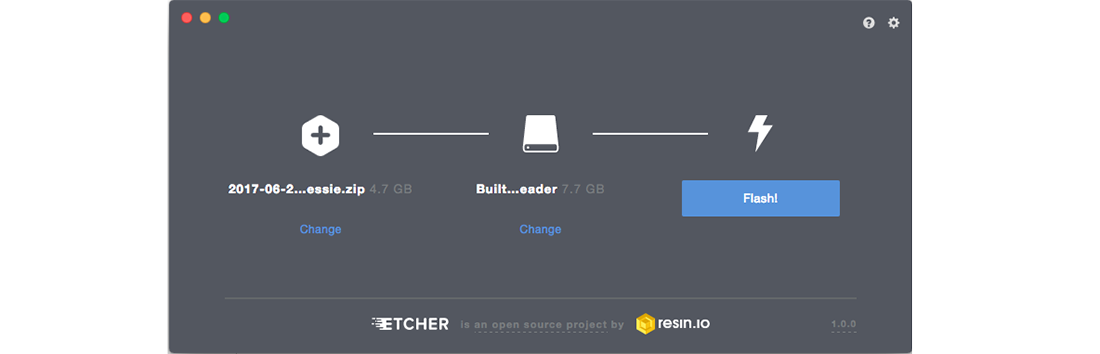
- Setting up the SD card. On a computer with an SD card reader, go to https://www.raspberrypi.org/downloads/raspbian/ and download the most recent Raspian distribution. (I chose Jessie with Desktop)
- Go to etcher.io and download that.
- Insert your new blank 8gb micro SD card into your computer and load etcher. Etcher should automatically find your SD card (it will report it as 7.7 GB.)
- Select your downloaded Raspbian file - you don't need to unzip it - and click on Etch and wait for a few minutes.
 Once that completes your done with setting up the card.
 - Put the card into your Raspberry Pi with the keyboard and monitor and turn it on. After a while you should see the desktop.
- From the icon at the top of the screen, connect to your wifi network.
- Open up the command-line and type:
- This will update your pi with any updates which haven't made the distribution. Whilst this is running, from the menu go to Preferences/ Raspberry Pi Config.
- From interfaces, turn ON SPI
(whilst you are here – also turn on VNC services (this is for a later section – and optional))
- Check for the time in the top right corner of the screen. If the time is correct - then the Pi has picked up the correct time from the internet via wifi. If the minutes are mostly correct but the hour is off you need to check your time zone. You still should be in the Raspberry Pi Configuration screen so click on the localisation tab and click time zone. Select your general area then a location and click OK.
 You should have now finished in the configuration tool. Close the tool and you will probably be asked if you want to reboot. But first:
 - Check to see if your apt –update script has completed. If it has it is ok to reboot the Pi. You will need to do this to make sure that the SPI is running on the Pi. So reboot now. (if you closed the config dialog without rebooting - just type sudo reboot now into the the command line and the pi should reboot)
- Once your pi has rebooted, if you changed the time, and the Pi has been able to connect back to wifi, you should see the correct time on the top right hand corner of the desktop.
- Now we need to check we have the most up to date SPI software, so open the command line and type:
sudo apt-get install python3-spidev python-spidev
After a while it will install, or tell you nothing needs updating. - Now get the inspiring scripts with:
git clone https://github.com/raspitv/raspio-inspiring.git
- this downloads them and puts them in the directory /home/pi/raspio-inspiring
- go to that directory using:
cd /home/pi/raspio-inspiring
and type:
python3 clock.py
- you should now see numbers scrolling up the screen, and if you have connected the inspiring board, you should see the LED's have started displaying the time in the manner of clock hands.
So that's the procedure I followed to get this running. CTRL-C breaks you out of the clock program. (which will also turn off the LED ring)
Further useful steps
I wanted to do a couple more things before I stopped. As for me this was working on my Pi 3 I wanted it to go on the Pi zero-w but didn't want to have to attach a monitor to it every time to make the clock script work. So the next part ties into turning on the VNC server we did on the interface tab.
- Go to
https://www.realvnc.com/docs/raspberry-pi.html
on a computer (or on the Raspberry Pi via the built in web browser. Although I haven't liked realVNC for a while as they seemed to be charging for something I thought was open source, they are allowing you to use their cloud services free on the Raspberry Pi for up to 5 non-commercial Pi's. So I withdraw my previous annoyance with them! - Sign up for your free account, then after noting this new account name and password, back on the Pi select the VNC logo in the top right corner. You can now log into realVNC which connects this Pi to your account, enabling you to have encrypted access through realVNC from other devices elsewhere at home or on the internet.
- But just whilst we are connected you may wish to do one more thing. If you have already seen your inspiring board working, and all the scripts and the LEDs work - you may wish to make the clock script start automatically when your Pi is powered on. Assuming you have used the git to install the python script in
/home/pi/raspio-inspiring/ do the following
sudo crontab -e
the Pi will ask you for the editor you want to use - choose 2 - pico, then you should get a screen like this:
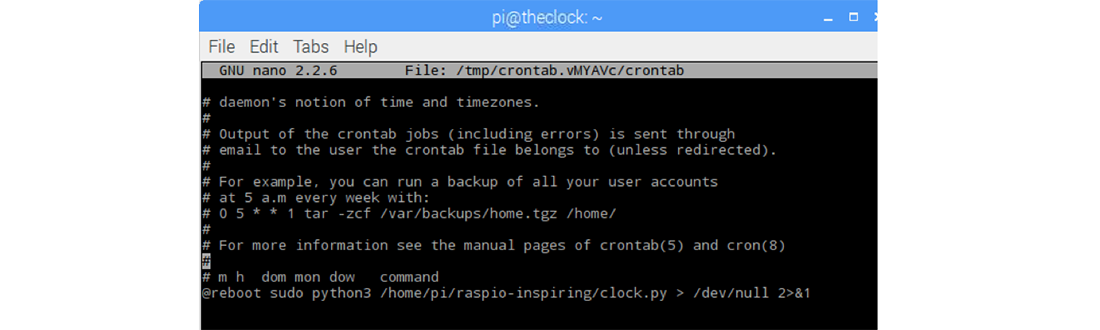
- at the bottom of the screen you need to enter the following:
@reboot sudo python3 /home/pi/raspio-inspiring/clock.py > /dev/null 2>&1
this will cause the script to be started whenever the pi is started. As you remember the clock script does actually produce a lot of output - which we don't want to clog up anything like a log file, so we send that output to ‘NULL' by adding > /dev/null 2>&1 at the end of the command to run the script. - Once you are certain that you have typed the @reboot command into pico correctly, save the file - by pressing CTRL-X and then pressing enter to save the file. Now I will be able to remotely operate the Pi there's no more need for me to use the keyboard and mouse and monitor, so I can now shutdown the setup system, transfer the inspiring board and SD card to the Pi zero and reboot. li>Type this:
- Once the Pi has closed down you can unplug its devices, and also, if you used a temporary Pi to set up the SD card, move the card to your Pi zero. Then connect the inspiring board and LED ring, and power it up.
- After a short wait you should see your new NTP clock LEDs spring to life with the correct time.
sudo shutdown now
All that remains - if you need it - is to connect to your Pi using a realVNC viewer and you should then see it as an available machine to control and be able to log into it and update your clock software or do more tinkering whenever you need to.
I'm really glad I backed the project. Next I'm going to design a case to mount the clock in.
7-Jul-2017 Add comment
blog comments powered by Disqus Permanent Link