Building a RichRap 3DR- Part 6 - Preparing to print
Thought you were nearly there?

It was an exciting event when I powered up my new RichRap 3DR which I had built with myself. The fans started humming and the LCD screen lit up and started telling me things. The control knob on the screen seems to work OK - although there is a slight delay on the interface updating. Pressing in the control knob gives a select action and an annoyingly loud beep.
The documented process was to use pronterface to start to test the printer but I had issues with that. The software installed on my mac, and I connected the supplied USB lead to the port on the Arduino but my version of pronterface didn’t seem to realise that I was using a delta. I was able to use it to activate the steppers but I kept moving the effector out of range of the print bed and it made an uncomfortable clunking noise, which I was hoping it wasn’t a breaking noise. The pronterface controls seemed twitchy and when the USB lead was connected, the mac’s touchpad wasn’t usable. I’ve since read that there are issues with long usb leads - so this may have been the problem. I’ll come back to this bit.
So I gave up on pronterface and tried to use the lcd screen to control the printer. First job was to see if the printer auto homes, that is, moves the carriages up to the limit switches on the top. Clicking on the control wheel reveals a set of menus, so then under the Prepare menu I selected Autohome.
And this happened:
Success! So I’d got everything wired in correctly so far and the right way around.
So off to thingiverse I go and download an STL file of a RepRap coin to print out, as RichRap suggested that a flat print was best for calibrating. I put this on the SD card and plugged it in. The screen recognised the card so I moved down to Print from SD card - and I could find the file but it would not select it. Not a gcode file I think it said. Hmm. I’d need to do some more investigation.
It transpired that I needed to do something to the STL file to convert it into the simpler G-Code that the printer needed. And that something was done with Slic3r! Thankfully another free program.
Slic3r has a setup wizaed and I ran through that - it asked things like the filament size (1.75mm) and the bed size (150x150), that sort of thing. I felt qualified to answer these questions, and a couple of minutes later loaded in the reprap.stl file and had turned it into a code file.
But there was a problem. The printer just didn’t start. It looked like it was doing something but it just didn’t. It just sat there.
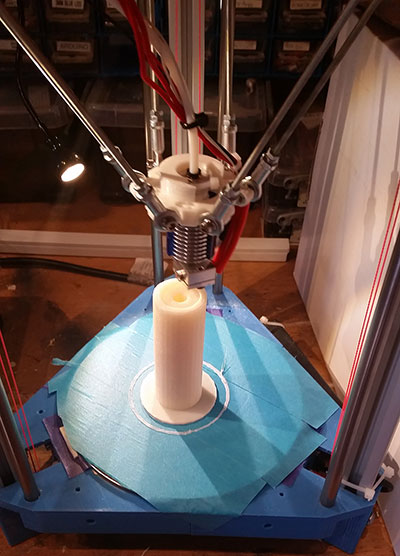
After a lot of tinkering with the Slic3r it still wouldn’t do anything. So I ended up reaching out to both RichRap and gcolborne to see who would reply first. They both did and I was grateful for both of their replies. It seemed that I had set the temperature of the hotbed to 60 degrees. It was waiting for that to heat up. Oh… There's your problem… I had neither the hotbed or the sensor to see what temperature it was printing at - no wonder the thing was just sitting there confused. In fact the screen had been telling me this all the time, I’d just not noticed. You can see from the photo at the top of this post its saying the target temp is 60, and its currently 0… If only I had realised that.
So more fiddling with the Slic3r settings and things start happening. But there was a problem. Again! A similar thing happened to when I was using Pronterface. Here it is in action:
I finally sent a version of this video to RichRap and gcolborne, this time again it was due to my ignorance of what I was being asked during the setup wizard. It had gone something like this:
Wizard: Whats the size of the print bed?
Me: Oh that's easy its 150mm diameter so its 150mm x 150mm
Wizard: Thank you. Now whats the print centre?
Me: Hey I’m getting good at this - if its 150mm diameter the centre must be 75,75. Nailed it.
Wizard: Thanks - I’ll set that up for you.
Me: Wow I’m clever.
Or not.. It transpires that on Delta printers the centre is always 0,0, so something was getting really confused by me saying it was 75,75 In the end I downloaded the Slic3r settings which gcolbourn had provided. I hadn’t really realised what they were at the first time I started playing with the software and this may have saved me some time. But setting the centre to 0,0 worked, and finally I was getting somewhere.
There were several more glitches, one of which was I had wired the extruder stepper backwards, so it was trying to suck filament out of the print head - but that was easily fixed by rotating the plug. I’ll explain more of the things I had to do to improve the print quality in a later post, but here are some results:


Back to Part 5 - Wiring it up
12-Jun-2015 Add comment
blog comments powered by Disqus Permanent Link