Arduino NANO expansion Board Terminal Adapter Kit
Mounting and connecting a nano board more securely

Although the larger Arduino boards come built into their own development board, with Dupont sockets to easily make external connections, some of the cheaper clones you can get come just with header pins like this:

You can, of course, use female Dupont wires to connect your devices to these boards, but a few of them have the headers pre-soldered underneath the board. This makes the connections untidy and difficult to mount as its upside down:

Read on to learn about an alternative and cheap ‘shield’ I found, which makes connections more permanent and enables secure mounting in projects.
As usual the eBay listing doesn’t really give the correct name for these, but searching for the following will get you one.
Expansion Board Terminal Adapter DIY Kits for Arduino NANO IO Shield V1.0 #T
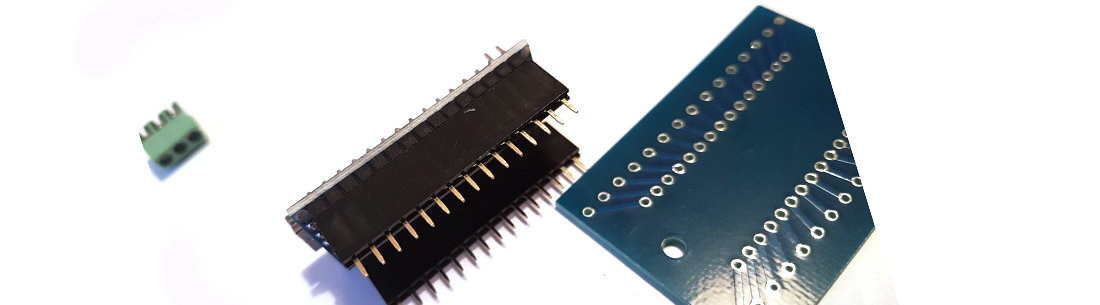
The boards come as a kit - and as a ready made board for about 15p more. The kit comprises of the pub, several green pub screw headers, and some PCB mount Dupont sockets that the Arduino headers plug into.
You can see the contents in the opening photo.
The PCB is quite simple, with no active parts at all - just connectors:

Some tips if you are making the kit:
The green screw connector blocks clip together. It is possible to solder them into the board one by one, but you get a much neater job if you clip them together and solder them in as a long assembly. This way they look nicely aligned, unlike my first attempt:

If you clip both of the sets of blocks for each side together first, and solder these, you can lay the assembly flat on the desk and solder all the connections in one go, without having to find a way of holding them in and balancing the board.
When you come to solder the Dupont connectors in, use an Arduino nano and apply these connectors to it first. Then attach and solder the connectors to the board. This way they will be aligned in a way that will make the Arduino easy to add and remove:
Here is a video of me building this kit before I learnt the tips above:
To be honest it was quite fiddly to build this board from the kit, and I would be tempted to just pay the extra 15p to get a pre-built one, unless you are building the kit for fun. The only thing that might make the kit useful is if you use these boards to mount a Nano into a finished project. One of my current projects takes power from the USB port on the Nano, and then connects to an external device via the 5v, Ground and a data pin. The only other thing I use the shield for is mounting the nano into the project box. So in this application, I might only populate the screw terminals which related to the three Arduino pins I used. This would reduce the weight of the final project, and also give me some spare screw terminals for future ones.
31-Mar-2017 Add comment
blog comments powered by Disqus Permanent Link